 |
 |
|
|
How to skin the playlist?
In this tutorial I will explain how to skin CoolPlayer's playlist.
It works a bit different than CoolPlayer's main window, but I tried to
make it as simple as possible.
Download the example skin here!
First of all the difference between the main window and the playlist is that
the playlist is scalable. This means a different approach in skinning.
The playlist works with a similar .ini style file like the main window.
Coordinated specified in the ini file are similar to the main window,
but they are calculated from the corners.
It is possible to connect a main window skin to a playlist skin by
putting a line in the main window skin ini file:
PlaylistSkin=playlist.ini
This way the playlist skin will be loaded when the main window skin is loaded.
1. Buttons.
The possible playlist skin buttons are:
| Name |
Definitions for |
Function |
| Add |
add.bmp |
Add a file or files to the playlist |
| Save |
save.bmp |
Save the platlist as a .m3u or .pls file |
| AddDir |
adddir.bmp |
Add a directory and all it's subdirectories to the playlist |
| MoveUp |
moveup.bmp |
Move the selected items one place up |
| MoveDown |
movedown.bmp |
Move the selected items one place down |
| Clear |
clear.bmp |
Clear the playlist (remove all). |
| ClearSel |
clearsel.bmp |
Clear the selected items. |
| Renumber |
renumber.bmp |
Renumber the playlist. |
| Shuffle |
shuffle.bmp |
Shuffle all items in the playlist. |
| Id3Tag |
id3tag.bmp |
Edit the ID3 tag of the selected items. |
| Rename |
rename.bmp |
Rename the selected files to their ID3 tag information. |
| Close |
close.bmp |
Close the playlist. |
| Close2 |
close2.bmp |
Close the playlist (for the upper right cross). |
| Minimize |
minimize.bmp |
Minimize the playlist. |
| Maximize |
maximize.bmp |
Maximize the playlist. |
| Find |
find.bmp |
Find text in the playlist. |
All bitmaps contain the buttons in two states: Up and Down. They are right above each other. They can be any size.
CoolPlayer will calculate the size automagically!
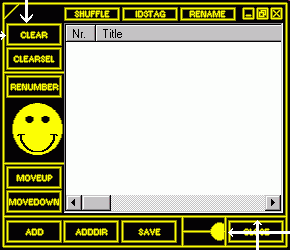
This is how a button looks:

All buttons have three values in the ini file.
Name=relative x coordinate, relative y coordinate, resizeflag (1=TopLeft, 2=TopRight, 3=BottomLeft, 4=BottomRight)
So for instance the Clear button in the topleft corner must be:

; when using TopLeft, x and y represent offsets from left and top borders
Clear=6,23,1
and Close in the bottomright corner:
; when using BottomRight, x and y represent offsets from right and bottom borders
Close=62,30,4
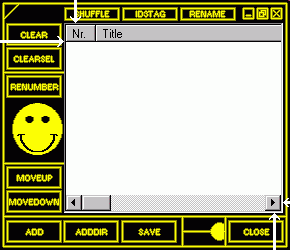
2. List Control.
The list control has a similar way of describing the coordinates, except all values are relative:
List=relative x coordinate (left), relative y coordinate (top), relative x coordinate (from right), relative y coordinate (from bottom)

In this case:
; x (offset from left), y (offset from top), x2 (offset from right), y2 (offset from bottom)
List=64,23,7,37
The list control can have colors defined for the background and the font.
; Background color, Text color
Colors=0xbbggrr,0xbbggrr
3. Background.
Now for the background. The background consists of only one bitmap (playlist.bmp), but it has
several areas to be defined.
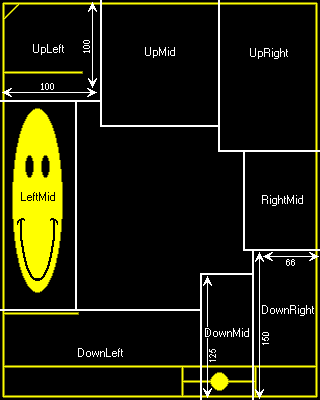
This image shows how the areas are defined:

All values are relative to their sides. For the Mid values there a
a condition. There are two ways of letting the playlist scale.
The Mid values will be stretched (1) or tiled (2).
For the bitmap above the values are:
; Playlist bitmap: playlist.bmp
; Corners: Width,Height
UpLeft=100,100
UpRight=100,150
DownLeft=200,90
DownRight=66,150
; Middles: Width,resizemode (1=Stretch, 2=Tile)
LeftMid=75,1
RightMid=75,2
; Middles: Height,resizemode (1=Stretch, 2=Tile)
UpMid=125,2
DownMid=125,2
4. Minimum playlist size.
When you have a nice skinned playlist but don't want a user to make it look ugly by
resizing too small, you can set the minimum playlist size just by adding the value:
; Minimum playlist size: Width,Height
MinSize=290,250
That's all!
|
|
|


